Showing posts with label Online. Show all posts

Transfer photos from Orkut to Facebook direclty


Transfer photos from Orkut to Facebook direclty?
Transfer photos from Orkut to Facebook direclty

How to copy photo albums from Orkut to Facebook directly without copying to hard disk???In case you want to delete or close your Orkut account permanently, but still want your photo albums to be with you in your Facebook account, read the steps below. Using Migrakut a custom application in Facebook this can be done as explained below.


1. Login to your Facebook account and copy paste this link in your address bar
    http://apps.facebook.com/migrakut/

Transfer photos from Orkut to Facebook direclty

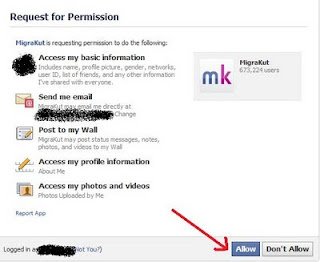
2. Then allow permission by clicking the Allow button as marked by Red arrow in below image -
Transfer photos from Orkut to Facebook direclty


3.  Then click on "Your Orkut Albums" in the next page as marked below -

Transfer photos from Orkut to Facebook direclty

4. After clicking a pop up window will come up as shown below and then cilck on Grant Access (marked by red) if you are using same mail id, otherwise sign in as a different user to log into your orkut account as marked by blue
Transfer photos from Orkut to Facebook direclty


5. I had a different Id for Orkut so I am going with Sign in as a different user. If you have same id then skip this step. Sign in with your username and password to Orkut after filling the log in window for orkut.


Transfer photos from Orkut to Facebook direclty


6. Then after logging in with your orkut username and password, select Grant access in the next pop up window.

Transfer photos from Orkut to Facebook direclty


7. Then it will go back to Facebook and show your photo albums there as shown for mine. Click on the radio button to select “Copy to Facebook”(marked In red) and then select (copy to facebook) marked in blue.

v


8. Then please wait till the photo album from Orkut is accessed.

Transfer photos from Orkut to Facebook direclty

9. Then you will get confirmation that it has been copied. You may need to refresh your browser if it do not at first instant, once you refresh then please repeat step 7 and you are done as shown in below image. You can directly see your photo album.


Transfer photos from Orkut to Facebook direclty


And you have imported all your photos in a album from Orkut to Facebook without saving it in your desktop. This is available for a single album at a time.

If you like this post, just I ask is to click on the Like button on top right.
Referance: mindhash.blogspot.in

How To Use Orkut Friends As Facebook Friends


How To Use Orkut Friends As Facebook Friends ?
How To Use Orkut Friends As Facebook Friends
 How To Import Orkut Friends In Facebook ?
How To Use Orkut Friends As Facebook Friends


If you have been using Orkut and later now started to use Facebook means, here we have the perfect solution to make your Orkut buddies friends to Facebook buddies.

Related : Microsoft Brings Facebook For Your Windows Mobile 6 Phone

•First, you have to drag this FaceBook Bookmarklet on to the bookmarks bar of your browser.
•Then this contact importer bookmarklet will appear on your Facebook homepage.
•Then Login to your Orkut account and click the Bookmarklet account button.

How To Use Orkut Friends As Facebook Friends


•Then Facebook Friend Finder tool will start scanning your Orkut contacts list and it will show you a subset who are also on Facebook. Then Click “Add Friends”. All it is done.
•Moreover, you can use this same friend finder bookmarklet for connecting Rediff contacts.

download pictures from Orkut

download pictures from Orkut

Downloading pictures from Orkut, Google's social networking site, is simple and can be accomplished in five steps. First, log into Orkut. Second, open the image you want to save. Third, drag the image to your web browsers address bar. Fourth, right click and select Save Picture As. VoilĂ . There's nothing to it. Save pictures from Orkut with this video tutorial.

Tricks To Download Photos From Facebook


Tricks To Download Photos From Facebook

 Extension for Google Chrome
If you use Google Chrome this will make you comfortable that this extension is integrated to the browser. To download all photos on a page just hit Ctrl + S. Download the extension
Tricks To Download Photos From Facebook

Firefox Extension
Similar to the plug-ins for Chrome users here is the one for Mozilla Firefox. ( link )
This fits into the context menu of the operating system. Just right click on a page with the photos you want to download.

Tricks To Download Photos From Facebook
Referance: www.hackonly.in

How to configure your Outlook GMail account


How to configure your Outlook GMail account


 Why should I use Outlook for my Gmail address?

Although the web based system of Google Gmail is one of the most feature rich webmail platforms, you may want to handle your Gmail account & messages from a client email software program such as Microsoft Outlook. For example, if you are using other email addresses and not just the Gmail account, most likely you would want to read and handle all your email accounts from the same interface & program.


 Configuring the Outook Gmail settings.

You can configure Outlook to handle your Gmail account as a POP3 or as an IMAP account. Depending on your choice, you have to enable the related account option in your Gmail account (Gmail Settings -> Forwarding and POP/IMAP).

Below, we will detail how to setup Microsoft Office Outlook 2000 to 2010 to send, receive and store email messages for a Gmail address. Before getting started, please make sure you know your Gmail email address and your Gmail password.
Start Outlook: from the main Outlook window, go to Tools -> Email Accounts.
How to configure your Outlook GMail account


On the Outlook popup window, select to "Add a new e-mail account" and click on Next.

How to configure your Outlook GMail account


On the server type step, select POP3 or IMAP (depending on your needs) for the Outlook email account type, then click on Next. There is no need to select the IMAP type, because the Gmail web based account will anyway keep a copy of all emails, just like an IMAP account would do.

How to configure your Outlook GMail account

On the next screen, you will have to specify your Outlook Gmail settings, such as your Gmail username and password, Gmail server addresses, Gmail server ports and Outlook Gmail display name.

On the User Information section, enter your Name (it can be anything, but remember this is going to be the name/text that people will see when you will send them an email via your Outlook Gmail account) and your Gmail email address.

On the Server Information section, enter the Google Gmail servers: 

POP Gmail servers for Outlook:
- Incoming mail server: pop.gmail.com
- Outgoing mail server: smtp.gmail.com.

IMAP Gmail server for Outlook: 
- Incoming mail server: imap.gmail.com
- Outgoing mail server: smtp.gmail.com.

As an alternative, you may setup any other outgoing mail server that you have access to, such as your ISP's SMTP server or your own hosted outgoing server. However, if you setup a 3rd party outgoing mail server, you will not have access to sent emails via your web based Gmail account panel.

On the Logon Information section, enter your Gmail User Name (which is the same as your Gmail email address) and your Gmail password. Tick the box "Remember password" in order to make Outlook to store the Gmail password, so it will not ask you about it every time when Outlook will send/receive emails for the Gmail account.

Click on the "More Settings" button and go to the "Advanced" window tab.

If you use Gmail as a POP Outlook account: 
- On the "Incoming server (POP3)" field, enter 995 and mark the box "This server requires an encrypted connection (SSL)";
- On the "Outgoing server (SMTP)" field, enter 465 and mark the box "This server requires an encrypted connection (SSL)".

If you use Gmail as an IMAP Outlook account: 
- On the "Incoming server (IMAP)" field, enter 993 and mark the box "This server requires an encrypted connection (SSL)";
- On the "Outgoing server (SMTP)" field, enter 587 and mark the box "This server requires an encrypted connection (TLS)".

For both POP and IMAP, you also have to enable the option "My outgoing mail server requires authentication" from the Outgoing Server tab.

You can also change the server timeouts period: this defines the time interval for which Outlook will wait to establish a Gmail connection, before triggering a connection error. The slower your Internet connection is, the greater period you should put.
The "Delivery" options are not important for an Outlook Gmail account: no matter what you would change here, Gmail will always keep a copy of each email on the Gmail server.

How to configure your Outlook GMail account

When you are done setting up your Outlook Gmail advanced settings, click on OK to return to the Outlook Gmail account window.

How to configure your Outlook GMail account


To verify your Outlook Gmail setup, click on the "Test Account Settings" button: this will make Outlook to attempt to login to your Gmail account and to send & receive an Outlook test email. If the test will succeed, you will notice the test email in your Outlook Inbox folder. If the test fails, Outlook will prompt you with the error messages - most likely, you didn't setup the correct server settings or the Gmail password is wrong.
Referance: emailaddressmanager.com

How to earn money online without any investment:


How to earn money online without any investment:


How to earn money online without any investment:


Earn money from YouTube money making program. YouTube has money making programme called YouTube partner program. Many YouTube partners make thousands of dollars from YouTube. Create and upload your original videos in YouTube and peoples watch the videos you get money from YouTube via papal or direct check. Apply for a YouTube partner program and make money. YouTube is a good way to make money online. Every time your videos watched by anyone you get money from YouTube. YouTube money making program is the one of the best money making program in online.


Make money from facebook by sponsored sharing. In facebook they are many money making opportunities are available. Make money from facebook by sponsored sharing is a good idea. First you must create a page and achieve maximum like for this page. If your page like reach a minimum level (eg: your page got 25000 likes) go to fiverr.com and post a advertisement “i will share your link in my fcebook page contain 25000 likes for $5”. Customers automatically come and you get money. Sponsored sharing i s a good idea to make money from facebook.

Make money from online survey jobs. Online survey jobs are help to make money online easy. Online survey jobs are the best way to make money online. The concepts of online survey jobs is companies pays a large amount of money to research market, business etc, survey companies take the task and research it in peoples. Survey companies pay a little amount of money to online survey takers. Online survey jobs are very easy to participate and make money online. I think globaltestmarket.com is a genuine online survey job provider.
Referance:Yahoo News